
Hello, this is Sone. In the previous article, I wrote about unboxing the resin 3D printer and getting it ready to start printing. And this is the second part. —let’s dive in.
Once I started printing, I saw it would take around five hours. So, while waiting, I went out for gyutan (grilled beef tongue) lunch with Mr. Kitabatake and the others, who were in town for a filming trip. A bit unrelated, but I really like how in certain places there are these “you must eat this here” local rules—it makes the culture so easy to feel.

While waiting, I realized I had already messed up two things. The first: I forgot to peel off the protective sticker covering the UV light panel at the base, which is used for curing the resin. I don’t know how much of an impact this will have since it’s just part of the panel, but I’m sure the areas with the sticker won’t cure properly… oh dear.

the sticker I left on by mistake
The second: I noticed there were a ton of bubbles in the resin. Apparently, before using it, you’re supposed to shake the resin bottle well and even stir it in the vat to remove bubbles. Printing with bubbles left in can lower the strength of the model or cause holes on the surface. Again… oh dear.

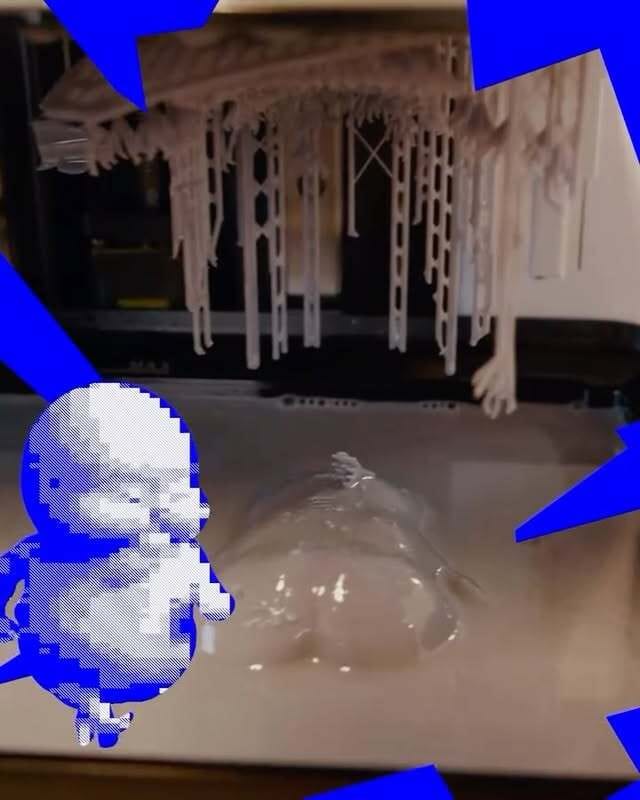
Just when it was looking like failure was inevitable, the final blow came. Around 80% through the print, I peeked inside to check on the progress…

Oh?
Normally, the model should have been forming with its back upward and building toward the belly side. But instead, it had detached from the supports, and its rear end was floating in the resin.

The model being printed:

Mr. Sasaki’s octopus.
My spirit was completely crushed. But since Mr. Sasaki’s octopus model seemed to be printing fine, I decided to at least let it finish.
ーーーーーーーーー
The print finished, and I took the models out.


The octopus came out clean! The part near the sharp corner of the base was blocked by the sticker I had forgotten to peel. I had also put in Mr. Matsunaga’s model, but unfortunately, it was positioned exactly over the stickered area, so it didn’t print at all… I’m sorry, even though you prepared the model.
And as for my model…


What a pitiful sight… I was speechless. “So this is the difficulty of resin printing…” It really felt like a baptism by fire.
As for why it failed this time, I can’t pinpoint it without more trial and error, but after checking various 3D printing videos and articles, I’ve compiled a list of possible reasons:
Insufficient exposure time for the bottom layers
Too few support structures
Supports not strong enough (too thin, etc.)
Poor orientation of the model—too much surface area at once
Forgot to stir the resin
Inadequate resin temperature control
Quite a list. The road ahead looks long and tough.

After washing and curing the print, I looked back: while the first print ended up disappointing, I feel like the areas for improvement became very clear. So next time, no matter what, I want to succeed.